
Algo Control API
The Algo Control API allows you to launch, stop, configure, and monitor your algorithms in real time through a fully customizable GUI.
You define the structure, behavior, and appearance of the interface - including fields, buttons, layouts, and views - while the platform handles rendering and interaction.
Key Capabilities
-
Custom Fields
- Define your own field names and types
- Control how data is displayed in the GUI
- Separate input fields and real-time output fields
-
Custom Buttons
- Add buttons at both header and record (row) level
- Assign custom actions via callbacks
- Fully control behavior per button
-
Multiple Views
- Define multiple GUI views with different column visibility
- Allow users to filter and organize data dynamically
-
Real-Time Updates
- Push live data updates from your algo to the GUI
- Efficient binary transport for low-latency environments
Integration Steps
-
Implement the Listener
Implement the
nanoconda::listenerinterface and initialize thenanoconda::dmasessionto receive UI events:oncontrolaction(...)- header-level actionsonrecordaction(...)- row-level actions
-
Define the GUI Schema
Populate a
nanoconda::interfaceschemastructure:- Define input fields (user-configurable parameters)
- Define record fields (real-time application state)
- Configure buttons and layout
-
Handle User Actions
Process incoming UI actions in your listener implementation:
- Start / stop logic
- Parameter updates
- Custom button behavior
-
Send Real-Time Updates
Use
setdatareport()to push updates to the GUI:- Update field values
- Reflect current application state
- Maintain synchronization with UI
Callbacks
Callback Listener
Communication between the application and gui is implemented via callbacks from GUI (for example when a remote user presses a GUI button) and API calls (when application needs to update GUI for the remote user).
In order to receive GUI callbacks, user must implement a listener class and inherit nanoconda::listener and initialize a nanoconda::dmasession
struct myListener : nanoconda::listener
{
      void onschemarequest(interfaceschema* schema) { };
      void oncontrolaction(datainput* input, int buttonId, int viewId) { };
      void onrecordaction(datarecord* record, int buttonId, int viewId) { };

      unsigned short oncustomrequest(const char* data, unsigned short size, char* responsebuffer, unsigned short responsemaxsize) { return 0; };
   /*
   ...
   */
}

...

int main(int argc, char *argv[])
{
   /*...*/

   myListener* l = new myListener();

   /*...*/
   nanoconda::dmasession* session = nanoconda::dmasession::init(account, rcode, cpu);

   /*...*/

   /*...*/
}
GUI Schema
In order for GUI to display application custom fields user must define field descriptions (Schema). It must be done in onschemarequest callback which will be raised whenever a User Starts Algo Window in GUI. The interfaceschema* is passed as an argument and must be filled.
User must populate: 1. Number of Input Fields 2. Number of Data Report Fields 3. Field Names and Types. 4. Optionaly, default, minimum, maximum and step values if user inputs should be limited or controlled.
   enum fieldType : unsigned char
   {
      NC_BLANK=0,
      NC_C=1,
      NC_UC=2,
      NC_S=3,
      NC_US=4,
      NC_I=5,
      NC_UI=6,
      NC_P=7,
      NC_STR=9,
      NC_LL=10,
      NC_ULL=11,
      NC_F=12
   };
      template <typename T> void setField(const char* name, fieldType type, T deflt, T min, T max, T step );
      void setField(const char* name, fieldType type);
Note
deflt, min, max, step must be of same type.
struct customField
{

   fieldType _type();
   char _c();
   unsigned char _uc();
   short _s();
   unsigned short _us();
   int _i();
   unsigned int _ui();
   long long _p();
   void _str(char* buffer);
   long long _ll();
   unsigned long long _ull();
   float _f();


   void _type(fieldType value);
   void _c(char value);
   void _uc(unsigned char value);
   void _s(short value);
   void _us(unsigned short value);
   void _i(int value);
   void _ui(unsigned int value);
   void _p (long long value);
   void _str(const char* value, int len); //max 7 bytes
   void _ll(long long value);
   void _ull(unsigned long long value);
   void _f(float value);

   char data[8];


};

enum hidemask : unsigned char
{
   NC_HIDE_FROM_NONE = 0b0000,
   NC_HIDE_FROM_VIEW1 = 0b0001,
   NC_HIDE_FROM_VIEW2 = 0b0010,
   NC_HIDE_FROM_VIEW3 = 0b0100,
   NC_HIDE_FROM_VIEW4 = 0b1000,
   NC_HIDE_FROM_ALL = NC_HIDE_FROM_VIEW1 | NC_HIDE_FROM_VIEW2 | NC_HIDE_FROM_VIEW3 | NC_HIDE_FROM_VIEW4,
   NC_SHOW_ONLY_VIEW1 = NC_HIDE_FROM_VIEW2 | NC_HIDE_FROM_VIEW3 | NC_HIDE_FROM_VIEW4,
   NC_SHOW_ONLY_VIEW2 = NC_HIDE_FROM_VIEW1 | NC_HIDE_FROM_VIEW3 | NC_HIDE_FROM_VIEW4,
   NC_SHOW_ONLY_VIEW3 = NC_HIDE_FROM_VIEW1 | NC_HIDE_FROM_VIEW2 | NC_HIDE_FROM_VIEW4,
   NC_SHOW_ONLY_VIEW4 = NC_HIDE_FROM_VIEW1 | NC_HIDE_FROM_VIEW2 | NC_HIDE_FROM_VIEW3

};

struct fieldDesc
{
   char name[24];
   char reserved[7];
   hidemask hideFrom;
   customField deflt;
   customField min;
   customField max;
   customField step;

   void setType(fieldType type)
   {
      deflt._type(type);
      min._type(type);
      max._type(type);
      step._type(type);
   }
   void setHideMask(hidemask hideMask)
   {
      hideFrom=hideMask;
   }
   template <typename T> void setField(const char* name, fieldType type, T deflt, T min, T max, T step );
   void setField(const char* name, fieldType type);
};


struct dataheader
{
   unsigned long long algoId;
   unsigned char algoIndex;
   hidemask hideFrom;
   unsigned char reserved2[6];
   unsigned long long symbolId;
   unsigned long long reserved4;
   void setHideMask(hidemask hideMask)
   {
      hideFrom=hideMask;
   }
};
struct algoheader : dataheader { };  // DEPRECATED


struct datainput : dataheader
{
   enum : unsigned short { MAX_DATA_INPUT_FIELDS = 50 };

   customField fields[MAX_DATA_INPUT_FIELDS];
   enum : unsigned short { MAX_ALGO_INPUT_FIELDS = MAX_DATA_INPUT_FIELDS }; // DEPRECATED - use MAX_DATA_INPUT_FIELDS
};
struct datainput : datainput { }; // DEPRECATED - use datainput

struct datarecord : dataheader
{
   enum : unsigned short { MAX_DATA_RECORD_FIELDS = 20 };

   customField fields[MAX_DATA_RECORD_FIELDS];
   enum : unsigned short { MAX_ALGO_RECORD_FIELDS = MAX_DATA_RECORD_FIELDS }; // DEPRECATED - use MAX_DATA_RECORD_FIELDS
};
struct algorecord : datarecord { }; // DEPRECATED - use datarecord

struct datareport
{
   enum : unsigned short { MAX_RECORDS = 40 };
   enum : unsigned short { MAX_HEADER_FIELDS = 20 };

   union {
    unsigned short recordCount;
    unsigned short algoCount; // DEPRECATED - use recordCount instead
   };

   unsigned short reserved1;
   unsigned short reserved2;
   unsigned short reserved3;
   customField headerFields[MAX_HEADER_FIELDS];

   union {
    datarecord records[MAX_RECORDS];
    algorecord algos[MAX_RECORDS];  //DEPRECAED - use records instead
   };

   enum : unsigned short { MAX_ALGOS = MAX_RECORDS }; // DEPCREATED - use MAX_RECORDS instead
};

struct algoreport : datareport { };

enum uicolor : unsigned char
{
   NC_BC_HIDDEN=0,
   NC_BC_BLUE=1,
   NC_BC_GREEN=2,
   NC_BC_CYAN=3,
   NC_BC_RED=4,
   NC_BC_MAGENTA=5,
   NC_BC_BROWN=6,
   NC_BC_GREY=7,
   NC_BC_YELLOW=8,
   NC_BC_ORANGE=9
};

struct actionbutton
{
   char name[14];
   uicolor color;
   hidemask hideFrom;

   void setButton(const char* name, uicolor usercolor, hidemask mask = NC_HIDE_FROM_NONE);

};


struct interfaceschema
{

   enum : unsigned short { MAX_HEADER_BUTTONS = 20 };
   enum : unsigned short { MAX_RECORD_BUTTONS = 20 };

   unsigned char inputFieldCount; // DEPRECATED - No longer required
   unsigned char algoFieldCount;   // DEPRECATED - No longer required
   unsigned char reserved[6];

   actionbutton headerButtons[MAX_HEADER_BUTTONS];
   actionbutton recordButtons[MAX_RECORD_BUTTONS];

   fieldDesc headerFields[datareport::MAX_HEADER_FIELDS];

   fieldDesc inputFields[datainput::MAX_DATA_INPUT_FIELDS];

   union {
    fieldDesc recordFields[datarecord::MAX_DATA_RECORD_FIELDS];
    fieldDesc algoFields[datarecord::MAX_DATA_RECORD_FIELDS]; //DEPRECATED - use recordFields instead
   };

};

struct guischema : interfaceschema { }; // DEPRECATED - use interfaceschema;
Example Schema call
Here is an example for creating a schema with custom Header fields, Header buttons, Input Fields and Algo report columns. Each of the fields and buttons can be masked / hidden from another view, allowing for multiple fully custom views. In this example we show a scenario where view 1 is used to launch customer algos, and view 2 is used to Edit already launched algos.
The below code produced the Schema:
void onschemarequest(nanoconda::interfaceschema* schema)
{

   //header fields
   //View 1 Header fields
   schema->headerFields[0].setField("Algo Launcher", nanoconda::NC_I, 1, 0, 100, 1);
   schema->headerFields[0].setHideMask(NC_SHOW_ONLY_VIEW1);
   schema->headerFields[1].setField("Icebergs Short", nanoconda::NC_I, 1, 0, 100, 1);
   schema->headerFields[1].setHideMask(NC_SHOW_ONLY_VIEW1);
   schema->headerFields[2].setField("Icebergs Long", nanoconda::NC_I, 1, 0, 100, 1);
   schema->headerFields[2].setHideMask(NC_SHOW_ONLY_VIEW1);

   //View 2 Header Field
   schema->headerFields[3].setField("Algo Editor", nanoconda::NC_I, 1, 0, 100, 1);
   schema->headerFields[3].setHideMask(NC_SHOW_ONLY_VIEW2);

   //Header buttons
   schema->headerButtons[0].setButton("Close All", NC_BC_RED);

   //View 1 Header Buttons
   schema->headerButtons[1].setButton("Warm Cache", NC_BC_CYAN, NC_SHOW_ONLY_VIEW1);

   //View 2 Header Buttons
   schema->headerButtons[2].setButton("Reverse All", NC_BC_BLUE, NC_SHOW_ONLY_VIEW2);
   schema->headerButtons[3].setButton("Block New", NC_BC_ORANGE, NC_SHOW_ONLY_VIEW2);


   //Record buttons
   schema->recordButtons[0].setButton("X",NC_BC_RED);

   //View 2 Record buttons
   schema->recordButtons[1].setButton("W",NC_BC_CYAN,NC_SHOW_ONLY_VIEW2);
   schema->recordButtons[2].setButton("R",NC_BC_BLUE,NC_SHOW_ONLY_VIEW2);
   schema->recordButtons[3].setButton("B",NC_BC_ORANGE,NC_SHOW_ONLY_VIEW2);

   //Inupt Fields (Left Panel)
   schema->inputFields[0].setField("Contracts", nanoconda::NC_I, 1, 0, 100, 1);
   //View 1 Input Fields
   schema->inputFields[1].setField("Stop Loss Distance", nanoconda::NC_P, 0, 0, 1000, 1);
   schema->inputFields[1].setHideMask(NC_SHOW_ONLY_VIEW1);
   schema->inputFields[2].setField("Take Profit Distance", nanoconda::NC_P, 0, 0, 1000, 1);
   schema->inputFields[2].setHideMask(NC_SHOW_ONLY_VIEW1);
   schema->inputFields[3].setField("Name", nanoconda::NC_STR);
   schema->inputFields[3].setHideMask(NC_SHOW_ONLY_VIEW1);
   schema->inputFields[4].setField("Direction", nanoconda::NC_C);
   schema->inputFields[4].setHideMask(NC_SHOW_ONLY_VIEW1);

   //View 2 Input Fields
   schema->inputFields[5].setField("Move Stop By", nanoconda::NC_P, 0, 0, 1000, 1);
   schema->inputFields[5].setHideMask(NC_SHOW_ONLY_VIEW2);
   schema->inputFields[6].setField("Move Profit By", nanoconda::NC_P, 0, 0, 1000, 1);
   schema->inputFields[6].setHideMask(NC_SHOW_ONLY_VIEW2);

   schema->inputFields[49].setField("Last Field", nanoconda::NC_P, 0, 0, 1000, 1);


   //Algo Report Fields
   schema->recordFields[0].setField("Instrument", nanoconda::NC_STR);
   schema->recordFields[1].setField("Open Price", nanoconda::NC_F);
   schema->recordFields[2].setField("Stop Price", nanoconda::NC_F);
   schema->recordFields[3].setField("Profit Price", nanoconda::NC_F);

   //View 1 Report Fields
   schema->recordFields[4].setField("Fills Short", nanoconda::NC_I);
   schema->recordFields[4].setHideMask(NC_SHOW_ONLY_VIEW1);
   schema->recordFields[5].setField("Fills Long", nanoconda::NC_I);
   schema->recordFields[5].setHideMask(NC_SHOW_ONLY_VIEW1);

   //View 2 Report Fields
   schema->recordFields[6].setField("Algo Pnl", nanoconda::NC_F);
   schema->recordFields[6].setHideMask(NC_SHOW_ONLY_VIEW2);
   schema->recordFields[7].setField("Algo Status", nanoconda::NC_STR);
   schema->recordFields[7].setHideMask(NC_SHOW_ONLY_VIEW2);
   schema->recordFields[8].setField("Was Edited", nanoconda::NC_STR);
   schema->recordFields[8].setHideMask(NC_SHOW_ONLY_VIEW2);

}
Communicating with the application
Once Schema is displayed user can set input parameters on the left and press either Submit or one of the custom Header buttons. Whenever 'Submit' or a Header Button is clicked user application will receive the oncontrolaction() callback with all input information plus buttonId and viewId of the button. Submit button is passed as a special buttonId=21.
Here is a sample implementation of submitting an algoreport back to the gui immediately inside oncontrolaction().
void oncontrolaction(datainput* input, int buttonId, int viewId) {

   printf("oncontrolaction buttonId %d viewId %d\n", buttonId, viewId);


   unsigned long long symbolId = input->symbolId;

   _areport.recordCount = 2;
   _areport.headerFields[1]._i(100);
   _areport.headerFields[2]._i(123);


   // Record 1
   nanoconda::* adata = &_areport.records[0];


   adata->symbolId = symbolId;
   adata->algoId = 1001;
   adata->fields[0]._str( "MNQM5",5);
   adata->fields[1]._p( 2756675000);
   adata->fields[2]._p( 2750000000);
   adata->fields[3]._p( 2760000000);
   adata->fields[4]._i( 0);
   adata->fields[5]._i( 1);
   adata->fields[6]._p( 12000000);
   adata->fields[7]._str( "ON",2);
   adata->fields[8]._c('N');

   // Record 2
   adata = &_areport.records[1];

   adata->symbolId = symbolId;
   adata->algoId = 1002;
   adata->fields[0]._str( "MNQM5", 5);
   adata->fields[1]._p( 2758075000);
   adata->fields[2]._p( 2754000000);
   adata->fields[3]._p( 2761000000);
   adata->fields[4]._i( 1);
   adata->fields[5]._i( 0);
   adata->fields[6]._p( -1000000);
   adata->fields[7]._str( "STOPPED",7);
   adata->fields[8]._c('Y');

   if(_session)
   {
      _session->setdatareport(&_areport); //can update report from anywhere (another thread)
   }

};

Records Buttons
Whenever a button is pressed on any of the records onrecordaction() callback will be raised. datarecord object will contain information of the record and buttonId and viewId will be passed to the callback.
Here is an example implementation of onrecordaction() where we send an opposing Sell market order and remove an algo line from internal and GUI algo reports.
void onrecordaction(datarecord* record, int buttonId, int viewId) {
   printf("onrecordaction algoId %llu buttonId %d viewId %d\n", record->algoId, buttonId, viewId);
};
Note
There are no requirements to how oncontrolaction() or onrecordaction() callbacks should be implemented. They serve as communication with a remote GUI user. For example user can ignore the some callbacks completely or create / delete multiple algo report lines in a single callback.
Updating Algo Report
We gave some examples on how to update GUI via calling setdatareport() with information about new and deleted algos in previous sections.
The beauty of setdatareport() is that it can be called from anywhere in your algo code.For example on order confirmations, executions or book updates. This can help pass real-time updates for each algo. Some useful information might be the real-time PNL of a specific algo or average price.
Gui data refresh rate is 4x a second, so there is no need to set setdatareport() more frequently (even though it is allowed).
A recommended approach to updating the GUI state is to have a separate thread that periodically updates the GUI with user internally kept algoreport:
pthread_t gui_pub_trhead;
pthread_create(&gui_pub_trhead, NULL, guiPublisher, myListener);

...


void* guiPublisher(void* data)
{
    myListener* l = (myListener*) myListener;
    if(!l) return NULL;
    if(!l->_session) return NULL;

    while (1) {
       l->_session->setdatareport(&l->_areport)
       usleep(250000); //sleep for 250 milliseconds
    }
    return NULL;
}
Sample Program: algodriver.cpp
The NanoConda package includes a sample program with the above functionality in src/algodriver.cpp.
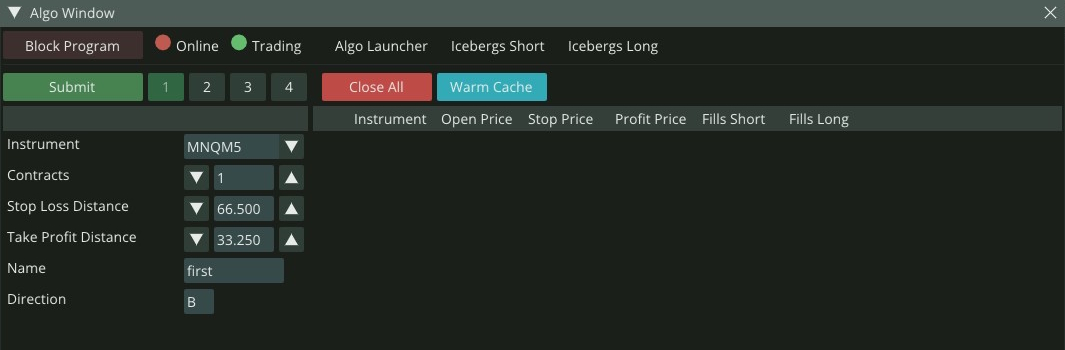
Here is the explanation of how algodriver.cpp generated the following Algo Window in GUI:
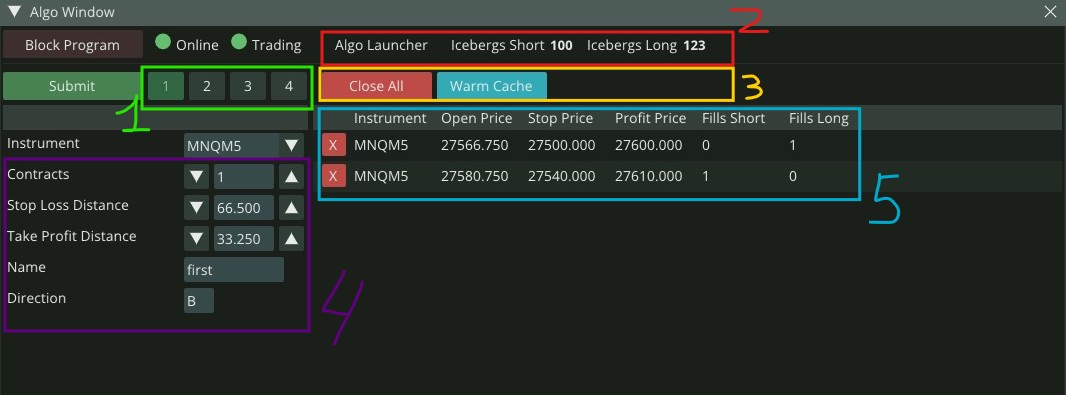
1. View Selector
Select between 4 distinct views and use setHideMask to decide which buttons, fields and records are visible on which view.
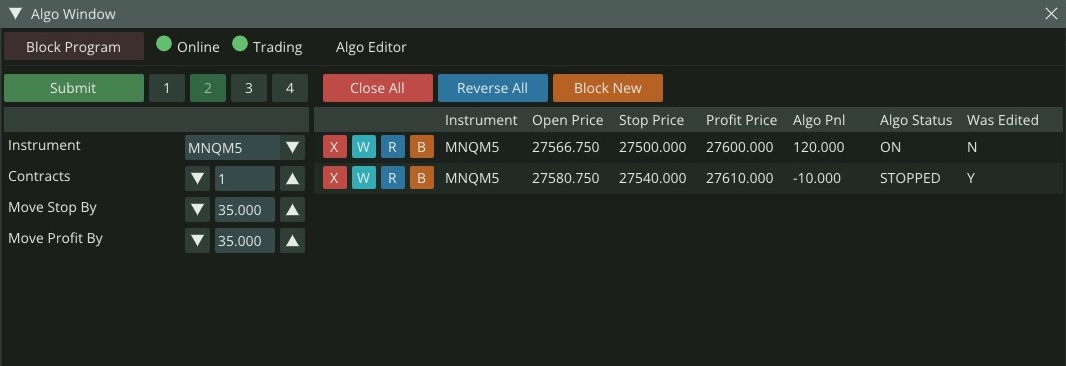
Here is how View #2 looks like for algodriver.cpp:
2. Header Fields
//header fields
//View 1 Header fields
schema->headerFields[0].setField("Algo Launcher", nanoconda::NC_I, 1, 0, 100, 1);
schema->headerFields[0].setHideMask(NC_SHOW_ONLY_VIEW1);
schema->headerFields[1].setField("Icebergs Short", nanoconda::NC_I, 1, 0, 100, 1);
schema->headerFields[1].setHideMask(NC_SHOW_ONLY_VIEW1);
schema->headerFields[2].setField("Icebergs Long", nanoconda::NC_I, 1, 0, 100, 1);
schema->headerFields[2].setHideMask(NC_SHOW_ONLY_VIEW1);

//View 2 Header Field
schema->headerFields[3].setField("Algo Editor", nanoconda::NC_I, 1, 0, 100, 1);
schema->headerFields[3].setHideMask(NC_SHOW_ONLY_VIEW2);
3. Header Buttons
//header fields
//View 1 Header fields
schema->headerFields[0].setField("Algo Launcher", nanoconda::NC_I, 1, 0, 100, 1);
schema->headerFields[0].setHideMask(NC_SHOW_ONLY_VIEW1);
schema->headerFields[1].setField("Icebergs Short", nanoconda::NC_I, 1, 0, 100, 1);
schema->headerFields[1].setHideMask(NC_SHOW_ONLY_VIEW1);
schema->headerFields[2].setField("Icebergs Long", nanoconda::NC_I, 1, 0, 100, 1);
schema->headerFields[2].setHideMask(NC_SHOW_ONLY_VIEW1);

//View 2 Header Field
schema->headerFields[3].setField("Algo Editor", nanoconda::NC_I, 1, 0, 100, 1);
schema->headerFields[3].setHideMask(NC_SHOW_ONLY_VIEW2);
4. Input Fields
//Inupt Fields (Left Panel)
schema->inputFieldCount = 7;
schema->inputFields[0].setField("Contracts", nanoconda::NC_I, 1, 0, 100, 1);
//View 1 Input Fields
schema->inputFields[1].setField("Stop Loss Distance", nanoconda::NC_P, 0, 0, 1000, 1);
schema->inputFields[1].setHideMask(NC_SHOW_ONLY_VIEW1);
schema->inputFields[2].setField("Take Profit Distance", nanoconda::NC_P, 0, 0, 1000, 1);
schema->inputFields[2].setHideMask(NC_SHOW_ONLY_VIEW1);
schema->inputFields[3].setField("Name", nanoconda::NC_STR);
schema->inputFields[3].setHideMask(NC_SHOW_ONLY_VIEW1);
schema->inputFields[4].setField("Direction", nanoconda::NC_C);
schema->inputFields[4].setHideMask(NC_SHOW_ONLY_VIEW1);

//View 2 Input Fields
schema->inputFields[5].setField("Move Stop By", nanoconda::NC_P, 0, 0, 1000, 1);
schema->inputFields[5].setHideMask(NC_SHOW_ONLY_VIEW2);
schema->inputFields[6].setField("Move Profit By", nanoconda::NC_P, 0, 0, 1000, 1);
schema->inputFields[6].setHideMask(NC_SHOW_ONLY_VIEW2);
5. Data Records Buttons and Columns
//Record buttons
schema->recordButtons[0].setButton("X",NC_BC_RED);

//View 2 Record buttons
schema->recordButtons[1].setButton("W",NC_BC_CYAN,NC_SHOW_ONLY_VIEW2);
schema->recordButtons[2].setButton("R",NC_BC_BLUE,NC_SHOW_ONLY_VIEW2);
schema->recordButtons[3].setButton("B",NC_BC_ORANGE,NC_SHOW_ONLY_VIEW2);


//Data Report Fields
schema->recordFieldCount = 9;
schema->recordFields[0].setField("Instrument", nanoconda::NC_STR);
schema->recordFields[1].setField("Open Price", nanoconda::NC_F);
schema->recordFields[2].setField("Stop Price", nanoconda::NC_F);
schema->recordFields[3].setField("Profit Price", nanoconda::NC_F);

//View 1 Report Fields
schema->recordFields[4].setField("Fills Short", nanoconda::NC_I);
schema->recordFields[4].setHideMask(NC_SHOW_ONLY_VIEW1);
schema->recordFields[5].setField("Fills Long", nanoconda::NC_I);
schema->recordFields[5].setHideMask(NC_SHOW_ONLY_VIEW1);

//View 2 Report Fields
schema->recordFields[6].setField("Algo Pnl", nanoconda::NC_F);
schema->recordFields[6].setHideMask(NC_SHOW_ONLY_VIEW2);
schema->recordFields[7].setField("Algo Status", nanoconda::NC_STR);
schema->recordFields[7].setHideMask(NC_SHOW_ONLY_VIEW2);
schema->recordFields[8].setField("Was Edited", nanoconda::NC_STR);
schema->recordFields[8].setHideMask(NC_SHOW_ONLY_VIEW2);
The Actual 2 lines in the algo records were populated with dummy data like this:
_areport.recordCount = 2;
_areport.headerFields[1]._i(100);
_areport.headerFields[2]._i(123);


// Record 1
nanoconda::* adata = &_areport.records[0];


adata->symbolId = symbolId;
adata->algoId = 1001;
adata->fields[0]._str( "MNQM5",5);
adata->fields[1]._p( 2756675000);
adata->fields[2]._p( 2750000000);
adata->fields[3]._p( 2760000000);
adata->fields[4]._i( 0);
adata->fields[5]._i( 1);
adata->fields[6]._p( 12000000);
adata->fields[7]._str( "ON",2);
adata->fields[8]._c('N');

// Record 2
adata = &_areport.records[1];

adata->symbolId = symbolId;
adata->algoId = 1002;
adata->fields[0]._str( "MNQM5", 5);
adata->fields[1]._p( 2758075000);
adata->fields[2]._p( 2754000000);
adata->fields[3]._p( 2761000000);
adata->fields[4]._i( 1);
adata->fields[5]._i( 0);
adata->fields[6]._p( -1000000);
adata->fields[7]._str( "STOPPED",7);
adata->fields[8]._c('Y');

if(_session)
{
   _session->setdatareport(&_areport); //can update report from anywhere (another thread)
}
Sample Algo: Brackets
The NanoConda package includes a sample trading algorithm called Brackets. This algo is designed as a simple example to demonstrate how to build trading strategies using the NanoConda API. It is also a useful template for developers starting custom algo development.
The Brackets algo extends the base prototype defined in:
Behavior
When launched from the GUI, the Brackets algo performs the following cycle:
- Sends a Market order in the direction selected by the user.
-
After the fill is confirmed, it sends a bracket consisting of:
- One Limit order (take profit)
- One Stop Loss order (risk protection)
-
When either of the bracket orders is filled:
- The position is fully closed
- The algo immediately restarts the cycle by opening a new position with another Market order
This shows how an algo can remain continuously active until explicitly stopped by the user.
Note
The Brackets algo is intended as a reference implementation only. Its logic is fully customizable. Users are free to:
- Modify the trading workflow
- Configure custom bracket logic
- Add risk or position sizing rules
- Control when algo lines are added or removed in the GUI
- Maintain any number of simultaneous algo instances
Tip
The above logic is all implemented inside the client code and is fully custom. User is free to chose how many algo lines are present in the report and when any line is added or removed.
Starting the Algo
To compile bracketsalgo please execute the following commands:
Usage: ./bracketsalgo -e exchange -s symbol1,symbol2,... -u username -p password [-a account] [-c cpu]

./bracketsalgo -e XCME -s ESM5,NQM5 -u hftclient -p password -a hftclientAcc100
Note
Please replace command line arguments for your use case.
GUI Controls
The Brackets algo can be controlled directly from the NanoConda GUI:
| Action | Description |
|---|---|
| Launch | Starts the algo and begins trading |
| X (Stop) | Stops the algo and closes open positions safely |
| Remove | Clicking X again when status is CANCEL removes it from the report |
Tip
After stopping, the algo status transitions to CANCEL, but it remains visible so the user can review metrics such as algo P&L and lifecycle events.
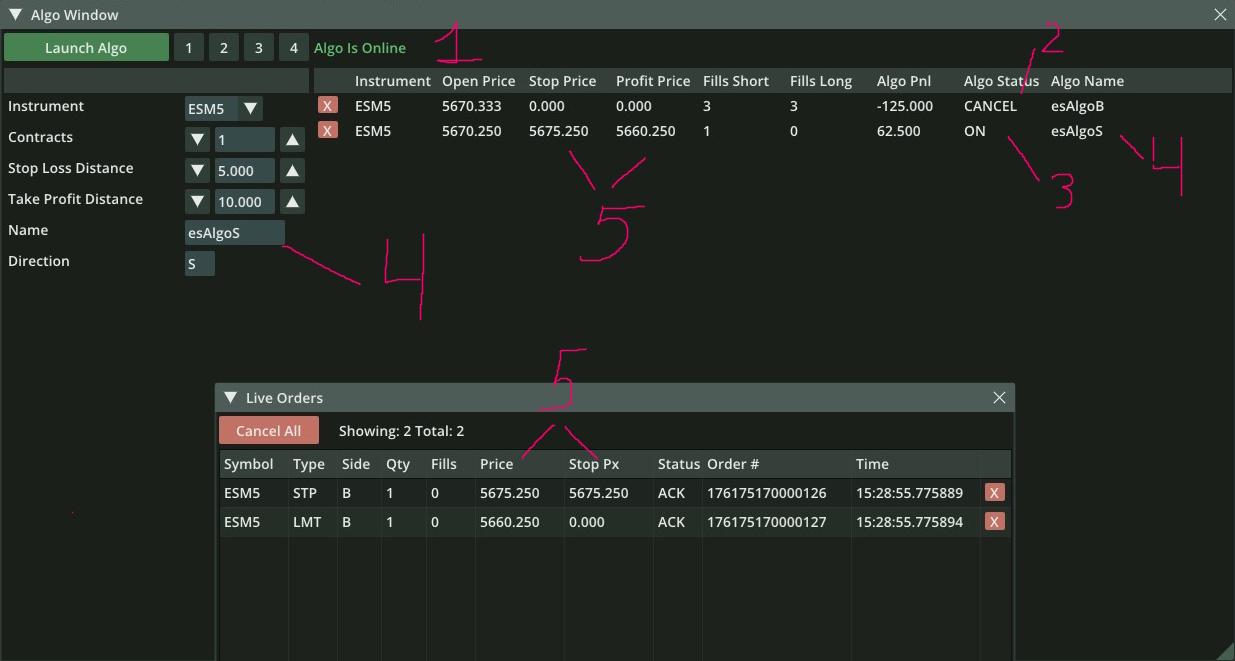
Notes:
Algo is Onlineindicates that the application is running and connected.- The first row shows Algo Status = CANCEL, meaning this algo was stopped via the API.
- The second row shows Algo Status = ON, meaning the algo is currently active and trading.
- Custom algo
Names were provided at launch to clearly identify which algo trades in which direction. - The active algo has linked Stop and Profit orders visible, and these can also be confirmed in the
Live Orderswindow.